Create Your Own Online Spend Tracker

Tracking your spending is a great thing to do every once in a while. Even if it’s just for a short period of time, tracking your spending can provide an amazing insight into where your money is going. It can help you understand if your spending actually lines up with your values and goals.
You may want to do this permanently, to help you track your progress towards your goals, or you may want to do this temporarily, perhaps to help get your spending back on track, or to find out where your miscellaneous spending is going. You may also want to do this 1-2 years before retirement, just to make sure that your retirement budget isn’t missing anything.
You might want to track your spending… but you don’t want to give Mint all your passwords or pay YNAB a monthly fee. What you’re looking for a low-cost budgeting alternative that is still somewhat automated and easy to use, so why not setup your own spend tracker using Google Forms and Google Sheets?
Don’t want to set up your own spend tracker? Use our free Budget Tracking template. It’s built on the same principles as below, but we’ve already done a lot of the work for you. (More details at the end of the post)
Creating your own spend tracker using Google Forms and Google Sheets is super easy to do. Google Forms integrates with Google Sheets so that every entry you make gets automatically added to your Google Sheet. As you spend money you simply pull up the Google Form on your phone, enter the amount and the category and hit submit. Google automatically adds this entry to your Google Sheet with a timestamp.
To help we’ve created a short video to guide you through the steps. In this video we’ll create a basic spend tracker, it’s nothing fancy but you can always add more functionality/charts later.
Related Posts:
- How to Make a Budget
- Six Easy Ways to Track Your Spending
- Blow Your Mind: Track Your Spending for 30 Days
Step 1: Go To Google Drive
To setup your spend tracker we’re going to use G-Suite. Head over to your Google Drive to get started (You can sign up for a free Google account and get access to everything for free).
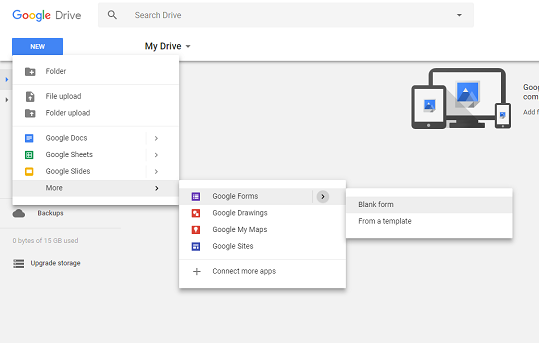
Step 2: Create A New Google Form
If you’re new to Google your drive might look like this. To setup a new Google Form to track your spending click on “New”, then on “More” and then on “Google Forms”. We want to create a simple form so choose “Blank Form”. This should automatically open a new tab with your new Google Form.
Step 3: Name Form
First thing we want to do is rename the form. You can use whatever you want here, “Spend Tracker”, “Budget Tracker”, “My Budget” etc etc. Use something descriptive so you can find it later in your G-Drive if you want to make changes.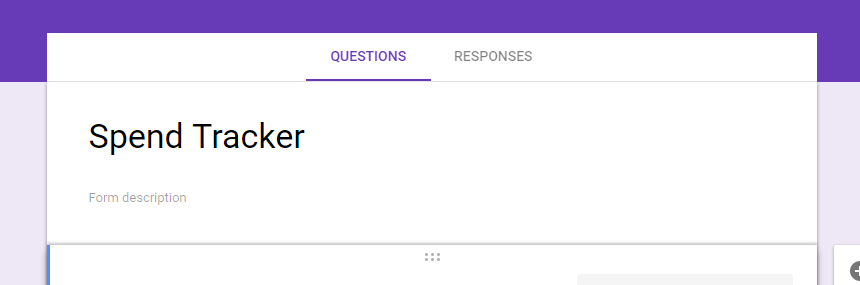
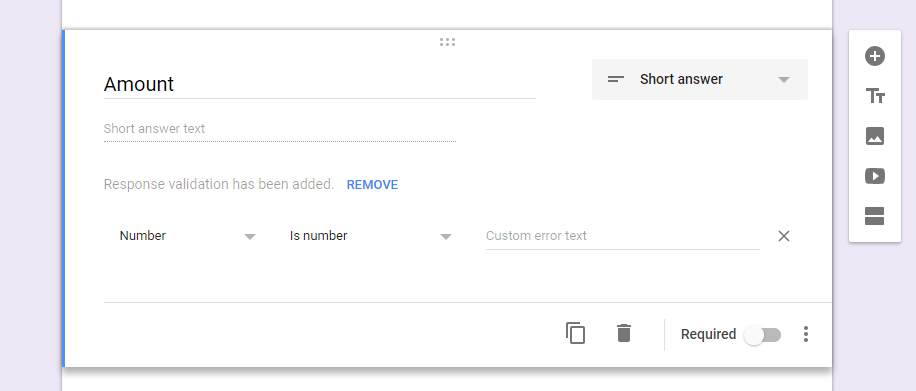
Step 4: Setup Amount Question
To add questions click the little “+” icon on the right hand side. The first question we’re going to add is for the amount of money we’ve spent. This will be a short answer question so choose “Short Answer” from the drop down menu on the right. Change the title of the question to “Amount”, this should automatically add the response validation logic.
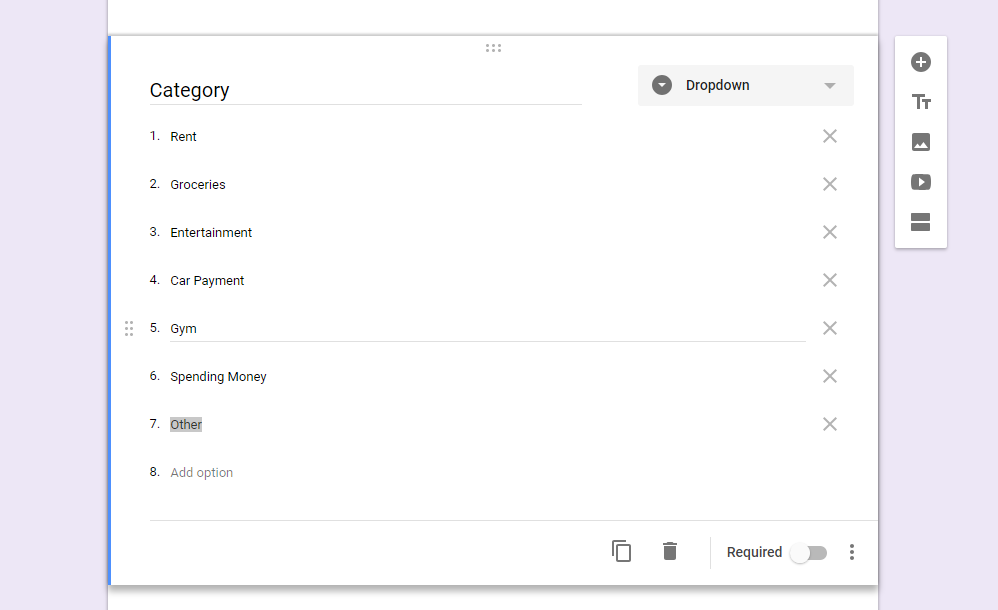
Step 5: Setup Category Question
The next question we want to add is the spending category drop down. These are the categories you want to divide your spending into. There are some example budget categories below but you can add more based on your personal situation. We recommend keeping the number of categories below 10-15. Add an “Other” category. Any random spending can be captured in the “Other” category.
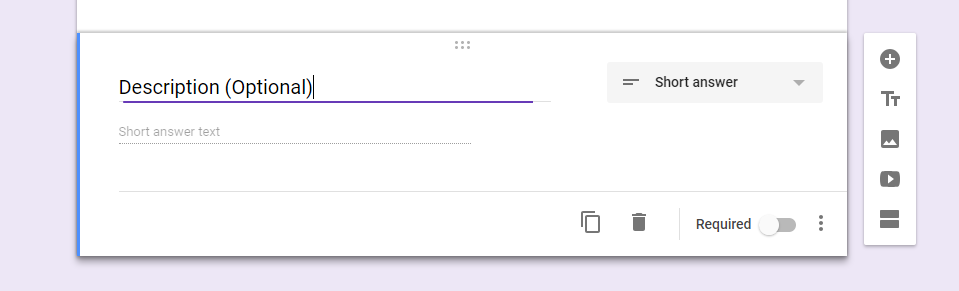
Step 6: Setup Description Question
The last question we’ll setup is a description question. You don’t have to use this question all the time but it’s useful when you want to add more info to your spending entry. For example if you use the “Other” budget category you might want to add a short description so that you can look back later and know what that money was spent on.
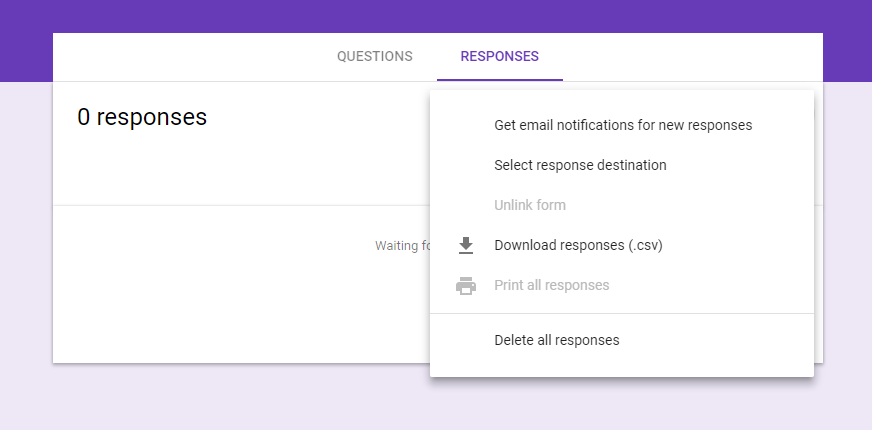
Step 7: Select Response Destination, Link To Google Sheets
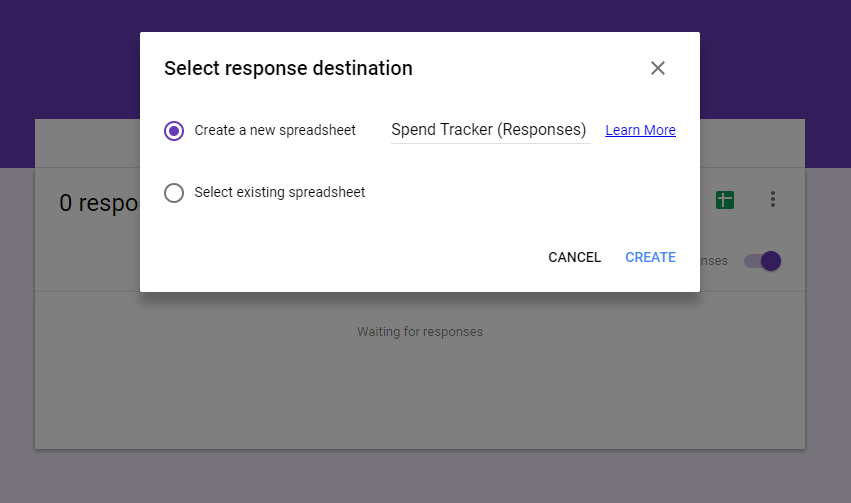
The neat thing with Google Forms is that responses can be automatically be spent to a Google Sheet. We’ll use this to automatically update our spending dashboard. Click on “Responses” at the top of the page”. Then click on “Select response destination”. We want to create a new spreadsheet. The spreadsheet name will automatically populate but you can change it if you wish.
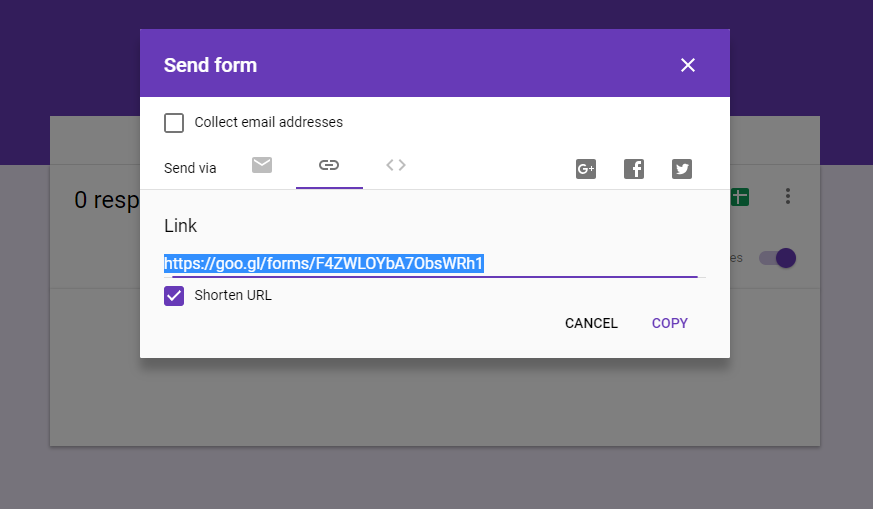
Step 8: Get Google Form Link And Save To Phone
The last thing we want to do in the Google Form is save the shortlink to our home page on our phone. This will make it super easy to add spending in the future. Just open your phone, click on the short link, then add the spending and hit submit on the form.
To get a short link click on “Send” in the top right corner. Then click on the link icon (the second icon beside “Send via”). Then use the “Shorten URL” option to get a shorter link.
Save this link in your favorites on your phone for easy access in the future.

Step 9: Setup Spending Dashboard in Google Sheet
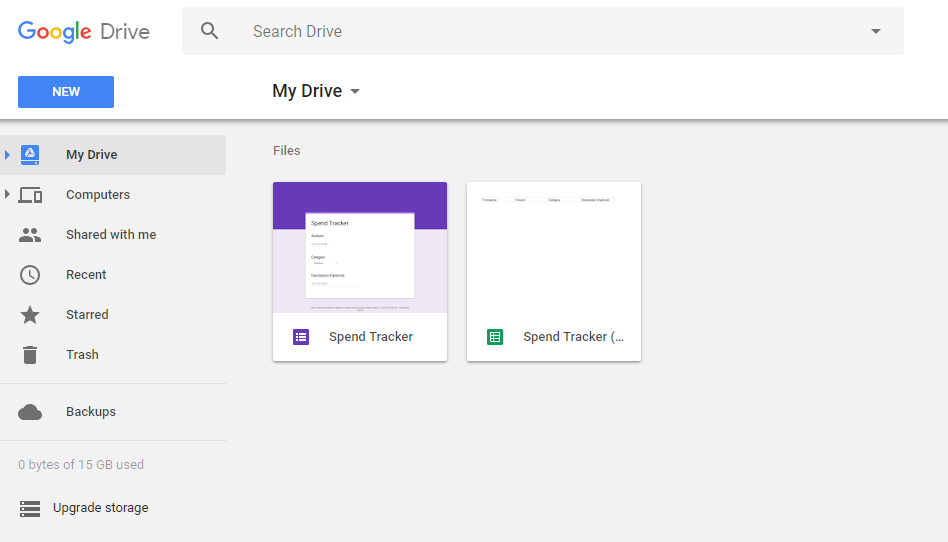
Now that we’re done setting up the Google Form to enter our spending we want to setup our spending dashboard in Google Sheets. Go back to Google Drive, you should see your newly created Google Sheet that is linked to your Google Form. Click on the Google Sheet so that we can get it setup.
Step 10: Add Extra Sheet
When you go into your Google Sheet for the first time there will be only one tab, this is the linked responses from your Google Form. As you enter spending info on your Google Form it will automatically show up here 1-2 seconds later.
We want to add a second sheet to be our spending dashboard. Click on the little “+” icon to add a new sheet.

Step 11: Setup Spend Dashboard
The last thing we want to do is setup the spend dashboard. We want to setup a Start Date and and End Date. These are the two dates between which you want to summarize your spending, usually we’ll choose the first of the month to track our spending for the full month. So in this case we’ll track spending from May 1st until June 1st. This will track spending from May 1st at 12am to June 1st at 12am. Add these to cells B2 and B3 as shown in the picture below.
Next we want to add our categories. Add a description to cell A5 like “Category” and then add your budget categories starting in cell A6. These should be exactly the same as the categories in your Google Form. If they’re not exactly the same it wont track your spending properly.
Then in cell B5 add the description “Spend” and in cell B6 add the formula you see in the picture below. This formula will automatically add up your spending between the two dates. You can also copy and past the formula here…
Hint: When you paste the formula do it directly in the formula bar (beside the little fx in the picture below). If you paste directly into a cell the quotation marks may not translate properly and you may need to retype them.
=sumifs(‘Form Responses 1’!B:B,‘Form Responses 1’!A:A,“>”&$B$2,‘Form Responses 1’!A:A,“<“&$B$3,‘Form Responses 1’!C:C,“=”&A6)
![]()
After adding the formula in cell B6 you can drag it down for all of your categories. This formula will automatically add up all the spending for each category between the start date and the end date.
If you want to get fancy you can add a Budget column and a Difference column. This will turn your spend tracker into a simple budget tracker.
To get even more fancy you can even add charts and graphs to help visualize your spending.
Personally I like to track my spending every once in a while. I keep a shortcut to my budget tracker on my phone. Entering new spending is easy using the link to the Google Form and the spending dashboard link on my phone lets me quickly see how I’m doing against my budget.
Use Our Budget Tracking Template
Does that seem a bit too complicated? Why not use our free budget tracking template. It also uses Google Sheets and Google Forms but is already set up with categories and some great visuals.
The budget tracking template also includes an option to track income as well. This lets you track both your income and spending very closely each month.
You can always customize the budget tracker even further, but it’s a great starting point if you’re looking to get a bit more clarity on your monthly cash flow.
Free Resources
Join over 250,000 people reading PlanEasy.ca each year. New blog posts weekly!
Tax planning, benefit optimization, budgeting, family planning, retirement planning and more...
Join over 250,000 people reading PlanEasy.ca each year. New blog posts weekly!
Tax planning, benefit optimization, budgeting, family planning, retirement planning and more...
Related Posts…


31 Comments
Trackbacks/Pingbacks
- Spring Financial Planning | June's Great Reads - […] Create Your Own Online Spend Tracker […]
I watched & followed your “Create Your Own Online Spend Tracker. And when I put in the formula
=sumifs(‘Form Responses 1’!B:B,‘Form Responses 1’!A:A,“>”&$B$2,‘Form Responses 1’!A:A,“<“&$B$3,‘Form Responses 1’!C:C,“=”&A6)
I get #ERROR! What am I doing wrong? Is there a place where the creation of these formulas are explained?
Hi Joanne, if you paste the formula directly into the cell sometimes the quotation marks around Form Responses 1 doesn’t translate properly, you might need to try pasting the formula into the formula bar or you can also try retyping the quotation marks (these things ‘ ) in the formula.
Thanks for this practical and useful post. I have the same Error problem with the sumifs formula. I’ve tried copy/paste, as well as typing in the formula myself. Any more suggestions? I am unable to understand how the sumifs formula works, so I cannot troubleshoot myself. 🙂
The fix for the formula in my case was to copy/paste into the fx bar, then delete and re-type the single quotation marks AND the double quotation marks. I was just re-typing the single quotation marks previously. Thank you again for the instructions to create this tool!
That’s great Wade, glad you were able to find the issue! Thanks for providing an update too, hopefully your comment helps others who may face the same problem.
Hello,
Attempting to create this for budgeting, but when I put amount in the google forms for the 1st question it doesn’t auto populate the response validation logic. Any tips?
Never mind, I found how to add it manually!
Hello again,
New problem. So I followed all the steps. Got it so that the formula translated fine and all and the amount I spent is showing up from the google form in “form response 1” tab, but it’s not carrying over to spend dashboard tab. I actually ended up creating a tab for each month, but they all have the formula to carry over form response 1 tab. So if the formula is accounting for the time stamp, then having a tab for each month shouldn’t matter right? Not sure where I’ve gone wrong?
Hi Jenna, you’re right, the month shouldn’t matter. If you paste the formula directly into the cell sometimes the quotation marks around Form Responses 1 doesn’t translate properly, you might need to try pasting the formula into the formula bar or you can also try retyping the quotation marks (these things ‘ ) in the formula.
What about automatic payments like sip, bank RD, etc? Is there a way to automatically submit the form on certain days of the month corresponding to such periodic payments.
Hi John, for regular payments you don’t actually need to add them via the form, you can add them manually in bulk on the spreadsheet itself using the same format as the other transactions. So, for example, if you had the same $75 payment on the 20th of each month you could already add these payments for the next 12-months with the correct future date and then as you switch the date in the summary tab it will automatically capture these payments.
Thank you for the solution. It would serve the purpose. There is one more question. Will the whole setup still work if I renamed the sheet “form responses 1” to something else?
Great! Yes changing the name would work, as long as the formula that looks up the values also changes. =sumifs(‘Form Responses 1’!B:B,‘Form Responses 1’!A:A,“>”&$B$2,‘Form Responses 1’!A:A,“<“&$B$3,‘Form Responses 1’!C:C,“=”&A6) So instead of "Form Responses 1" this would need to change to the new name of the sheet.
This is amazing and just what I’m looking for! Let’s say I already set up my Spending Dashboard. Is it possible to assign the start and end dates to a certain column range (my spending dashboard is already set up for Q1of 2022 i.e. Jan, Feb, March with categories for spending and columns for actual, budget, and differentials for each)?
Hi AJ, you can definitely track spending for a specific date range. If you take a look at step 11 it has details on how to add a “start date” and an “end date” and then summarize the spending between those two dates.
I am so close. It looks like I have everything the same, but when I add the formula to the formula bar, I only get errors in the cells. Now granted I am new at this.
Hi Carrie, it might be that the quotation marks need to be retyped into the formula. Otherwise typing in the entire formula is a last resort option as well.
From the post above…
“Hint: When you paste the formula do it directly in the formula bar (beside the little fx in the picture below). If you paste directly into a cell the quotation marks may not translate properly and you may need to retype them.”
Hi. This was a really helpful video, I’m glad I found it. I set everything up as the video explains, and entered the formula manually to avoid the problems with copy and pasting. The code is functioning, and I dragged the code from one cell to the rest – so each cell is operating on the same code. However, only the summation of one of my categories (travel) comes up on my dashboard. Not sure how to fix, any thoughts?
Hi Ben, the last part of the formula should be looking at the category cell. So in the example the formula looks at cell A6, which is the “Rent” category in the example above. You’ll need to double check that the A6 increases to A7, A8, A9 etc as you drag down the formula to lower rows.
Hi Owen. Yes, the last part of the formula increases with each cell. It’s so odd that only one output is working.
Very odd, I’m going to send you an email to see if we can figure this out.
Hi! I was wondering how it would look for the next month, do I have to create a new sheet with new dates?
Hi Estelle! Good question, you wouldn’t need to create a new sheet, you can keep adding transactions using the Google Form and then simply change the “Tracker Start Date” and “Tracker End Date”. The Google Sheet will automatically bring in the spending data between those two dates. Hope that helps!
Hi Owen and thanks for this great tool! Quick question for you. If I create a new date range, do I lose my data from the previous month? In other words, does it start all over again? If so, do you know of anyway to archive the previous month’s data?
Thanks again,
Hi Andrew, great question, the data entries will stay in the separate tab. Changing the date range in the summary tab will only change what data entries are being summarized.
Hi. I have followed all the advise but still get an #Error. I have managed on one occaion to avoid the error, but instead just got a value of 0 despite having some test amounts entered.
I’m not sure if you’re able to help at all? Thank you.
Hi J-M, I’ll send you a message directly and we’ll see if we can get it sorted out.
I had used your ready made template in the past, but got away from budgeting for some reason (bad move). Anyway, I am starting fresh, and am using your ready-made budget tracker. I have added additional categories and it seems that the formulas have copied down properly. The problem I am having, which I think I had last time as well, is that the information from the google form goes to the google sheet, but it doesn’t populate into the summary tab of the sheet. I’m wondering if there is something wrong with the original formula? This is from the “actual column” : =if(isblank($B19),””,sumifs(‘New Expenses Data’!B:B,’New Expenses Data’!A:A,”>=”&$M$2,’New Expenses Data’!C:C,”=”&B19)+sumifs(‘Savings Data’!B:B,’Savings Data’!A:A,”>=”&$M$2,’Savings Data’!D:D,”=”&B19,’Savings Data’!C:C,”Deposit to savings”)-sumifs(‘Savings Data’!B:B,’Savings Data’!A:A,”>=”&$M$2,’Savings Data’!D:D,”=”&B19,’Savings Data’!C:C,”Withdrawal from savings”)-(sumifs(‘New Expenses Data’!B:B,’New Expenses Data’!A:A,”>”&$M$3,’New Expenses Data’!C:C,”=”&B19)+sumifs(‘Savings Data’!B:B,’Savings Data’!A:A,”>”&$M$3,’Savings Data’!D:D,”=”&B19,’Savings Data’!C:C,”Deposit to savings”)-sumifs(‘Savings Data’!B:B,’Savings Data’!A:A,”>”&$M$3,’Savings Data’!D:D,”=”&B19,’Savings Data’!C:C,”Withdrawal from savings”))) Any help you could give me would be greatly appreciated!
Hi Dyana, I’ll send you a message directly and see if we can get it sorted out.
Hi! I am excited to try the PlanEasy pre-made template. Since we have many expenses that come around only once or twice a year, I find it helpful to be able to see the BIG picture, which means seeing our annual category budgets and spending in real time in addition to monthly, so that we can adjust in future months for categories we are overspending on early in the year etc.
I was wondering if there is a way to add the option to see the full CALENDAR YEAR spending and savings on the bottom left in addition to the “Current month”, “Last Month”, and monthly categories that are in the template? I know i can do this if i make the whole thing myself using your instructions and the Start and End date ranges to create different spending period summaries, but I love your your template looks visually and not sure how easily i can replicate that!
Hi Gary, if you’re good with excel/google sheets then it would definitely be possible to add a full year summary. You’ll need to replicate the format and formulas in the monthly summary and then adjust the start & end dates in the formula. Happy budgeting!